

Imagine creating a polished checklist in Microsoft Word, effortlessly ticking off tasks as you go—no fuss, no delay. Whether you’re drafting project plans, designing interactive forms, or crafting printable task lists, knowing how to insert check mark in Word can elevate your workflow with clarity and professionalism.
Why This Article Is Your Go-To Resource
- It addresses the exact user intent: simple, clear methods to insert a check mark in Word.
- It’s SEO-optimized with relevant terms like “tick mark in Word,” “Word symbol check mark,” “checkbox in Word,” and “insert tick symbol Word.”
- It aligns with Google’s helpful content approach—focused on people-first, original content that provides real value Google for Developers.
- It’s readable and actionable, with bullet points, step-by-step instructions, and usability-focused explanations.
- It avoids keyword stuffing by weaving in LSI (latent semantic indexing) terms naturally: symbol insertion, bullet checklist, character code, content control, interactive form, and printable list.
At-a-Glance: 6 Smart Ways to Insert a Check Mark in Word
1. Use the Insert » Symbol Dialog (Wingdings or Segoe UI Symbol)
- Place the cursor where you want the check mark.
- Go to Insert → Symbol → More Symbols.
- In Font, choose Wingdings. Use character code 252 for a basic check or 254 for a boxed check Microsoft Support.
- Another option: select Segoe UI Symbol and use 2713 or 2714 (hex code) for different check styles Microsoft Support.
- Click Insert then Close. Resize or recolor as needed.
LSI terms used: symbol insertion, printable list, bullet checklist.
2. Use Alt + Character Code — Fast & Keyboard-Driven
- Press and hold Alt, then type 0252 (plain check) or 0254 (boxed check) using the number keypad.
- Release Alt, and you’ll get a symbol—switch its font to Wingdings to see the check mark TechRepublic.
Why it helps: Best for users who prefer hotkeys and quick symbol entry.
3. Type Unicode and Use Alt + X
- Type 2713 or 2714 directly in your document.
- Press Alt + X—Word instantly converts the code into a check mark Microsoft Learn.
- Want something bolder? Try 2714. Also, use 2611 for a checkbox with check inside; 2610 for an empty checkbox Microsoft Learn.
SEO-friendly terms: Unicode shortcut, tick symbol Word.
4. AutoCorrect Shortcut for Frequent Use
- Open More Symbols, pick your check mark.
- Click Shortcut Key, assign something memorable like \chkmrk.
- Now typing \chkmrk auto-inserts the check symbol.
Why it’s handy: Saves time when inserting ticks repeatedly — especially for long documents.
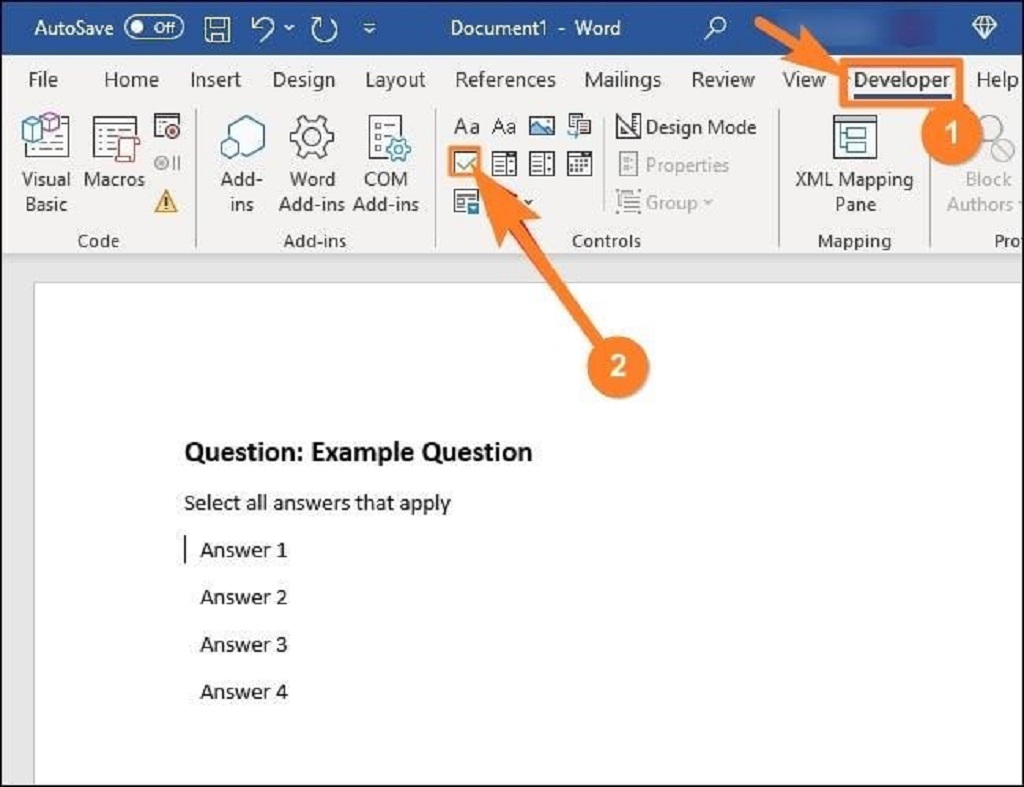
5. Use Word’s Content Control Checkbox (Interactive Option)
- Go to Insert → Developer tab → Check Box Content Control.
- (If Developer tab is hidden: File → Options → Customize Ribbon → tick Developer.)
- Insert an interactive checkbox—perfect for fillable digital forms that allow clicking on/off.
LSI terms: interactive form, digital checklist.
6. Custom Bullet with Check Mark (Printable Style)
- Go to the Home tab, click the Bullets dropdown → Define New Bullet.
- Choose Wingdings 2 and select the check box symbol.
- Every list item gets a check-styled bullet—great for printed to-do lists Indeed.
Why you’ll love it: Makes aesthetically pleasing, easy-to-follow checklists for print.
Quick Comparison Table
| Method | Best For | Pros | Cons / Considerations |
|---|---|---|---|
| Symbol dialog (Wingdings/Segoe) | Occasional use | Visual preview, flexible | Slightly manual |
| Alt + Code | Keyboard-loving power users | Fast if you remember codes | Needs numeric keypad |
| Unicode + Alt+X | Tech-savvy, Unicode fans | No menu navigation | You must recall codes |
| AutoCorrect shortcut | Frequent document use | Instant insertion | Setup required |
| Content Control checkbox | Interactive digital forms | Clickable checkboxes | Developer tab needed |
| Custom bullet | Printable lists | Stylish and structured | Not interactive |
Best Practices & Accessibility Tips
- Legibility matters: Use readable fonts like Calibri or Arial around symbols, especially for users with low vision Microsoft Support.
- High contrast: Don’t rely solely on color to convey meaning—underlines or bolding supplements accessibility Microsoft Support.
- Screen reader friendly: Combine symbols with clear text (“Complete: ✔”) to ensure accessibility.
Read More Also: Homemade Mounjaro Recipe
Frequently Asked Questions (FAQs)
Q: Can I insert a check mark on Mac?
A: Yes—methods like Insert → Symbol, Unicode + Alt+X (Word 2016+), and AutoCorrect work on macOS too, though Alt codes differ.
Q: How do I remove a content control checkbox?
A: Select it and press Delete, or right-click → Remove Content Control.
Q: Can check marks be customized in color or size?
A: Absolutely! Select the symbol or checkbox, then apply color and size formatting via the Home or Format toolbar.
Q: Which method is best for printed forms?
A: Use custom bullets or symbol insertion (Wingdings)—they render consistently in print.
Final Thoughts: Choose What Works for You
- For simplicity: Use Insert → Symbol.
- For speed: Memorize Unicode + Alt+X or Alt + code.
- For repeat use: Set an AutoCorrect shortcut.
- For interactivity: Insert a Content Control checkbox.
- For print-friendly style: Define a check-mark bullet.
Each method offers unique strengths — pick what aligns best with your workflow goals.