
Transforming your garage with an epoxy floor coating can dramatically improve its appearance and durability. However, many homeowners worry that their old, cracked concrete will prevent them from achieving professional results. Fortunately, you can successfully apply epoxy to damaged concrete surfaces with the right preparation and techniques.
This guide will walk you through every step of the process, from assessing your concrete to enjoying your newly finished floor.
Understanding the Condition of Your Concrete
Before starting any epoxy project, you need to evaluate your garage floor honestly. Walk around and inspect every crack, pit, and damaged area. Small hairline cracks are common and easily manageable. Meanwhile, larger cracks wider than a quarter inch require more extensive repair work.
Additionally, look for signs of moisture issues. Water seepage can ruin an epoxy application, so addressing these problems beforehand is essential. Check for oil stains, paint spills, and other contaminants that might interfere with adhesion.
The age of your concrete matters less than its current condition. Even decades-old concrete can accept epoxy beautifully when properly prepared. Therefore, don’t let the age of your garage floor discourage you from this worthwhile project.
Gathering Your Materials and Tools
Success depends largely on having the right supplies ready before you begin. You’ll need concrete crack filler or repair mortar for damaged areas. A concrete grinder or floor buffer with diamond grinding pads helps create the ideal surface texture.
Furthermore, you’ll require a shop vacuum, degreaser, etching solution or muriatic acid, and your chosen epoxy coating system. Most importantly, gather safety equipment including goggles, gloves, and a respirator mask.
For tools, prepare paint rollers with extension handles, squeegees, and mixing buckets. Having everything organized saves time and prevents delays during critical stages of application.
Cleaning and Degreasing the Surface
Start by removing everything from your garage and sweeping thoroughly. Next, address any oil stains with a commercial degreaser. These stains are surprisingly common and can prevent proper epoxy adhesion if not removed completely.
Apply the degreaser generously and scrub with a stiff brush. Allow it to sit for the recommended time before rinsing thoroughly. Consequently, you may need to repeat this process for stubborn stains.
After degreasing, rinse the entire floor with clean water and allow it to dry completely. This step typically takes 24 to 48 hours depending on humidity levels and ventilation.
Repairing Cracks and Damage
Now comes the crucial repair phase. For small cracks, use a concrete crack filler that’s compatible with epoxy coatings. Clean out the crack first by removing loose debris with a wire brush or vacuum.
Fill the crack slightly above the surface level, then smooth it with a putty knife. Larger cracks require a more robust approach using concrete repair mortar. Mix the mortar according to package directions and work it deeply into the damaged area.
Additionally, fill any potholes or significant divots using the same repair mortar. Allow all repairs to cure for the time specified by the manufacturer, usually 24 to 72 hours. Proper curing ensures these repairs won’t fail under the epoxy coating.
Etching or Grinding the Concrete
Creating the right surface profile is absolutely essential for epoxy adhesion. According to This Old House, proper surface preparation determines whether your epoxy coating will last for years or fail within months.
You have two main options for surface preparation. Etching with muriatic acid is less expensive but creates more mess and fumes. Alternatively, mechanical grinding provides superior results and better opens the concrete’s pores.
If you choose etching, mix the acid according to directions and apply it evenly across the floor. Scrub the surface while the acid works, then neutralize and rinse thoroughly. For grinding, rent a professional concrete grinder and work in overlapping passes across the entire floor.
The goal is creating a surface that feels like medium-grit sandpaper. This texture allows the epoxy to penetrate and bond mechanically with the concrete.

Dealing with Moisture Issues
Moisture is epoxy’s worst enemy. Test your concrete for moisture by taping plastic sheets in several locations and waiting 24 hours. If condensation appears underneath, you have a moisture problem that needs addressing.
Sometimes, simply improving ventilation and using a dehumidifier solves minor moisture issues. However, serious moisture problems may require professional moisture mitigation systems before epoxy application.
Never skip this step, as moisture will cause the epoxy to bubble, peel, or fail to cure properly. Therefore, patience during this phase saves you from costly do-overs later.
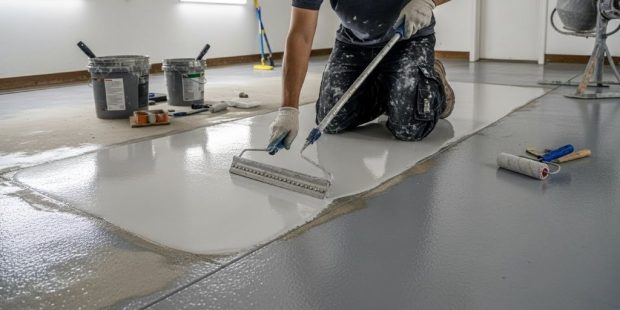
Applying the Epoxy Coating
Finally, you’re ready for the main event. Mix your epoxy according to the manufacturer’s instructions, paying careful attention to the ratio of resin to hardener. Most epoxies have a limited working time, so plan to work efficiently.
Start in the corner farthest from the garage door and work backward toward the exit. Pour the epoxy in small sections and spread it using a squeegee, then back-roll with a texture roller. This technique ensures even coverage and removes air bubbles.
Work in sections of approximately four feet by four feet. Maintain a wet edge to prevent visible seams between sections. Additionally, if you’re adding decorative flakes, broadcast them while the epoxy is still wet.
Adding a Second Coat
Most professional-quality results require at least two coats of epoxy. The first coat acts as a primer and fills the concrete’s pores. Meanwhile, the second coat provides the bulk of the thickness and durability.
Wait for the first coat to cure according to package directions, typically 12 to 24 hours. The surface should be dry to the touch but still have some grip when you walk on it. This timing ensures proper bonding between coats.
Apply the second coat using the same technique as the first. Many installers find the second coat easier because the surface is already sealed and more uniform.
Curing and Protection
After applying your final coat, the real waiting game begins. Epoxy needs time to cure fully before accepting foot traffic and vehicle weight. Light foot traffic is usually acceptable after 24 hours.
However, wait at least 72 hours before driving on the surface. Full cure takes about seven days, during which the epoxy continues hardening and reaching maximum durability. Keep the garage well-ventilated during curing to help fumes dissipate.
Protect your investment by placing cardboard under car tires for the first few weeks. This precaution prevents tire marks and allows the epoxy to reach full hardness.
Maintenance and Long-Term Care
Once cured, epoxy floors are remarkably easy to maintain. Sweep or dust mop regularly to remove dirt and debris that could scratch the surface. For deeper cleaning, use a mild detergent and warm water.
Avoid harsh chemicals or abrasive cleaners that might dull the finish. Place mats under vehicles to catch drips and make cleanup easier. Additionally, consider applying a clear topcoat every few years to maintain the glossy appearance.
According to Family Handyman, proper maintenance can help your epoxy floor last 20 years or more, making it an excellent long-term investment.
Conclusion
Applying epoxy to old, cracked concrete is entirely possible with proper preparation and patience. The key lies in thoroughly repairing damage, creating the right surface profile, and following application instructions carefully. While the process requires several days and physical effort, the resulting durable, attractive floor justifies the investment.
Remember that surface preparation accounts for roughly 80 percent of your project’s success. Take your time with cleaning, repairs, and etching or grinding. Additionally, don’t rush the curing process, as patience during this phase ensures your floor reaches its full potential. With these techniques, your garage will have a professional-looking epoxy floor that lasts for decades.
Frequently Asked Questions
Can I apply epoxy over previously painted concrete?
You can apply epoxy over painted concrete, but you must first remove all paint completely. Paint prevents proper adhesion, so use a concrete grinder or chemical stripper to remove it entirely. Test a small area first to ensure good bonding.
How wide can cracks be before epoxy won’t work?
Cracks up to half an inch wide can be successfully repaired and coated with epoxy. Wider cracks may indicate structural problems requiring professional assessment. Always fill cracks completely before applying epoxy.
Do I need special epoxy for cold climates?
Yes, temperature affects epoxy curing. Most epoxies require temperatures above 50 degrees Fahrenheit during application and curing. Cold-weather formulas are available for garage floors in chilly climates.
How long does garage floor epoxy typically last?
Properly applied epoxy floors last 10 to 20 years or longer with good maintenance. The lifespan depends on traffic levels, surface preparation quality, and environmental factors like moisture and temperature fluctuations.
Can I do this project in one day?
No, epoxy garage flooring requires multiple days. Surface preparation takes one to two days, repairs need 24 to 72 hours to cure, and the epoxy itself requires application time plus several days for curing before use.
Related Topics: